In this article we show how to do Arduino development on an Raspberry Pi 3 with Raspbian. We will describe how to install the GNU GCC tool chain for the AVR microcontroller family, how to compile the archetypal "hello world" program for the Arduino UNO, and how to upload it to an Arduino UNO board.
Introduction
The Arduino UNO is a prototyping board based on the Atmel ATMega328P microcontroller.
The Raspberry Pi is a family of single board computers with ARM based processors. The Raspberry Pi 3 Model B is the latest member of that family (at the time we write this). The Raspberry Pi 3 Model B is quite capable of being used as a desktop development machine. Several Linux distributions are available for the Raspberry Pi. The Raspbian Linux distribution is one of those. Raspbian is based on Debian and is optimized for the Raspberry Pi hardware. Raspbian provides most (all?) of the packages available from the venerable Debian distribution, making it an easy choice for a development system.
In this article we are going to show how you can use a Raspberry Pi 3 installed with Raspbian to develop code intended to be run in an Arduino UNO board. We will do this by going through the steps to create a program for making the Arduino blink a LED. The blinking LED is the archetypal "hello world" program for microcontrollers.
- Blinking LED circuit introduces the circuit diagram for the Arduino with blinking LED. This is a one of the simplest circuits involving an Arduino.
- Installing the GNU GCC tool chain for Arduino shows how to install the tool chain for compiling C code for the Arduino.
- Arduino "hello world" program continues with the instructions for compiling the blinking LED program.
- Uploading the program image to Arduino, finally, shows how to upload the compiled program to the Arduino board.
Please note that in this article we will not be using the Arduino IDE (though it is also available for Raspbian) for writing and compiling our code. We are going to write plain C code and compile it with the GCC cross-compiler for the AVR architecture.
Blinking LED circuit
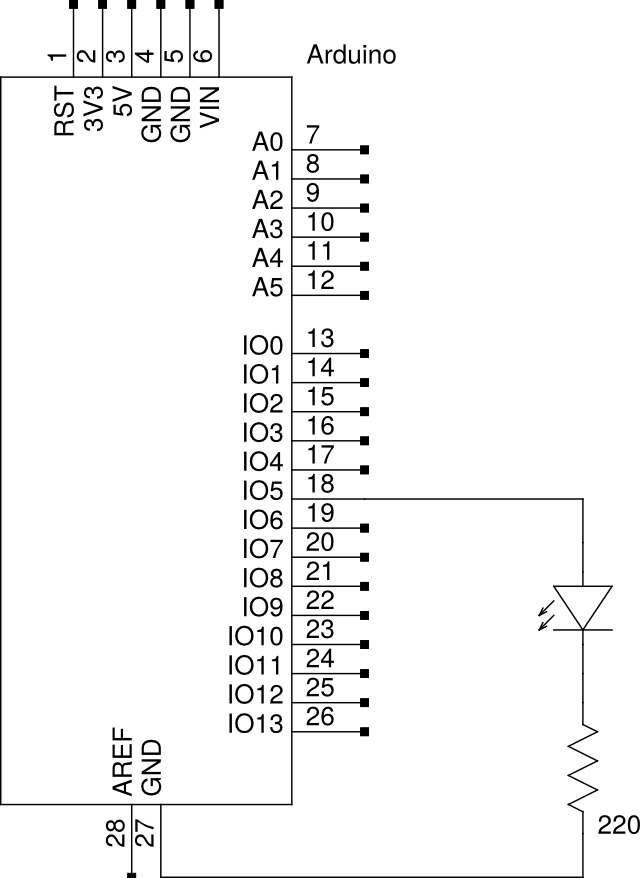
The "hello world" program for a microcontroller involves making a LED blink. We thus have to prepare the circuit with a LED connected to the Arduino UNO board. The figure below shows the schematic for the circuit that we are going to assemble.
|
| Circuit diagram showing how to connect the LED to the Arduino board. |
The circuit diagram above was created with the
gschem tool of the gEDA project
software suite.
Installing the GNU GCC tool chain for Arduino
The tool chain required for writing C programs for the Arduino is the standard GNU GCC tool chain. This same tool chain can actually be used with the whole Atmel family of AVR microcontrollers. All the required packages are available from the standard Raspbian repositories. We will make use of the following packages:
- gcc-avr - GNU GCC cross compiler for the AVR architecture.
- avr-binutils - GNU Binutils tools for the AVR architecture. These include the GNU linker and other tools for generating the final image files.
- avr-libc - A standard C library for the AVR architecture. This includes the ATMega368p microcontroller of the Arduino UNO.
- avrdude - Tool for uploading program images into the Arduino board.
The procedure for installing the above packages under Raspbian is the
familiar one using the apt-get tool. To wit, from a command line:
apt-get install gcc-avr binutils-avr avr-libc avrdude
Now that we have the tools for compiling code, we can continue with actually writing the code in order to compile it.
Arduino "hello world" program
We are now going to write and compile our "hello world" program. As we
mentioned before, this will be a program to just make a LED blink in
the Arduino board. The full program source code is shown below. The
instructions later on will assume we have this code saved in a file
unimaginatively named HelloWorld.c.
#include <avr/io.h>
#include <util/delay.h>

const int BLINK_DELAY_MS = 500;

int main(void) {
    /* Set pin 5 of port D for output*/
    DDRD |= _BV(DDD5);

    while (1) {
        /* Set pin 5 of port D high to turn led on */
        PORTD |= _BV(PORTD5);
        _delay_ms(BLINK_DELAY_MS);

        /* Set pin 5 of port D low to turn led off */
        PORTD &= ~_BV(PORTD5);
        _delay_ms(BLINK_DELAY_MS);
    }
    return 0;
}
You will have noticed that the C code makes reference to a pin 5 of port D. The avr-libc library provides a set of functions and macros to interact with the pins from the Atmel AVR microcontroller. In the avr-libc library the pins are named by their native Atmel conventions, and not by their numbering in the Arduino UNO board.
The Arduino documentation describes the pin mapping between the pins in the Atmel AVR processor and the numbering in the Arduino UNO board. From that we see that pin 5 in the Arduino board where we connected our LED (see circuit diagram in Blinking LED circuit) corresponds to pin 5 of port D on the Atmel AVR processor. And it is this pin 5 in port D that we refer to in the C code.
Detailed information on available ports, and how to work with them is available in the ATMega368p data sheet provided by Atmel. Documentation for the avr-libc function and macros used in the program is available on the avr-libc user manual.
We have the source code, we can go ahead and compile it. To compile the code for the Arduino UNO board we will use the GCC cross compiler we installed in the previous section. The commands for compiling the code and producing the final image file are the following:
avr-gcc \
    -DF_CPU=16000000UL -mmcu=atmega328p \
    -o HelloWorld HelloWorld.c
avr-objcopy -O ihex -R .eeprom ./HelloWorld ./HelloWorld.hex
The HelloWorld.hex image file is the final result of compiling the C
source code. It is this image file that is used in the next step when
uploading the compiled program to the Arduino board.
Uploading the program image to Arduino
Finally we are now going to upload the compiled program to the Arduino board. After uploading the program the Arduino board will automatically start running the program.
In order to upload the program to the Arduino board we first need to connect the board to the host PC with an USB cable. The host PC is, of course, our Raspberry Pi 3 happily running Raspbian.
To upload the code to the Arduino board we need the avrdude
tool. The command for uploading the image for the "hello world"
program we created in the previous section is the following:
avrdude \
    -c arduino \
    -p ATMEGA328P \
    -P /dev/ttyACM0 \
    -U flash:w:./HelloWorld.hex:i
After the above command completes the program will automatically start running in the Arduino board. The LED should by now be merrily blinking away.
The /dev/ttyACM0 device referenced in the command above is the
serial device for communicating with the Arduino board. You can
confirm the device path for your specific case by looking into the
messages appearing in /var/log/syslog when you connect the Arduino
board with the USB cable to the host computer (i.e. your Raspberry Pi
3).
Conclusion
We showed in this article how to prepare a Raspberry Pi 3 with Raspbian to be a development host for Arduino programming. We started with installing the compiler and other development tools. Then we compiled a program for making a LED blink in the Arduino board. And finally we uploaded the program image file to the Arduino board to see it running.